You’re trying to send an MMS message on your new Samsung S9 Plus handset but it won’t go through. Apparently, something’s wrong and that is what you need to find out and deal with first so you’ll get MMS back up and running smoothly on your device again. This context highlights some generic solutions and workarounds for you to try on, should you need some additional inputs on how to troubleshoot MMS issues on your Samsung Galaxy S9 Plus, particularly with sending errors. Read on to learn more.
Before going further, if you found this post because you were trying to find a solution to your problem, then try to visit our Galaxy S9 Plus troubleshooting page as we’ve already addressed most of the commonly reported issues with the phone. We’ve already provided solutions to some of the problems reported by our readers so try to find issues that are similar with yours and use the solutions we suggested. If they don’t work for you and if you need further assistance, fill up our Android issues questionnaire and hit submit.
How to troubleshoot Galaxy S9 Plus that can’t send MMS
Before troubleshooting software problems on your Samsung S9 Plus that might have prevented you from sending MMS, be sure to check on the following:
- Verify and ensure that the picture or video you want to send via MMS messaging is included in the supported files types for Samsung S9 Plus MMS or photo/video messaging. Among the supported file types are JPEG (*.jpg, *.jpeg, *.jpe), BMP (*.bmp), PNG (*.png), GIF (*.gif), 3G2 (*.3g2), 3GP (*.3gp), MPEG4 (*.mpg) and audio type MIDI (*.midi).
- Also ensure that the multimedia file you are about to send is not damaged or corrupted. While you may be prompted with an error in this case, sometimes a corrupted file just won’t send.
If the problem continues after verifying prior requisites to send and receive MMS, then move on and troubleshoot software problems that might have caused conflicts with your phone’s MMS messaging functions.
First solution: Restart your messaging app and phone.
Just like computer programs, mobile apps that are glitching are often rectified by a restart either on the app or device itself. Basically all you have to do is close or quit the problematic apps and then after a few seconds, open it again. This simple workaround helps in clearing minor errors that might have caused the app to misbehave. That said, try to quit and restart your messaging app with these steps:
- Touch and hold the Recent apps key found in the bottom left corner of your phone. Doing so will open a new screen containing all your recently opened apps.
- To close an individual app, just swipe it to the right or tap the X on it.
- If you have multiple apps running in the background, you can also quit them all at once by tapping on the Close All button.
Once you’re done closing the apps, perform a soft reset on your device or simply restart your Samsung S9 Plus. Here’s how it’s done:
- Press and hold the Power button.
- Tap the option to Power off.
- Tap Power off again to confirm.
- After about 30 seconds, press and hold the Power button again until your phone boots up.
Alternatively, you can do this:
- Press and hold the Power and Volume Down buttons simultaneously for up to 45 seconds.
- Release both buttons when the Samsung logo appears.
After your phone boots up completely, retry sending MMS through your messaging app then see if it’s now able to send. If not, then move on and try other applicable solutions.
Second solution: Disable/enable mobile data.
It’s another simple trick that already helped many people who have dealt with various types of MMS errors on their respective Android devices. It somehow refreshes mobile data function on your phone that’s likely glitching thus not working as intended. If you wish to give it a shot, then do so with these steps:
- Open the Apps screen by swiping on an empty spot from the Home screen.
- Tap Settings.
- Tap Connections.
- Select Data usage.
- Tap the Mobile data switch to turn the feature ON or OFF. In this case, it has to be turned on so as to enable mobile data services on your device including MMS sending and receiving.
- If it’s already turned on, try to toggle the switch to turn Mobile data off for a few seconds and then tap the switch to turn it back on.
If you cannot send MMS on your device and you’re seeing mobile data warning, then it might be that you’re already reached the specified data usage level on your account. Contact your carrier to verify this matter. Alternatively, you can use a Wi-Fi connection to continue using mobile-data dependent apps on your phone.
Third solution: Clear cache and data on your messaging app.
Temporary files and data that are stored as cache on the Messages app or other messaging apps can also be the possible triggers especially when they get corrupted. To make sure this isn’t what’s preventing you from sending MMS, then do some cache and data clearing on your Samsung S9 Plus with these steps:
- Swipe up on an empty spot from the Home screen to show the Apps screen.
- Tap Settings.
- Tap Apps.
- Locate the messaging app you are using, if not the stock Messages app. If you can’t find the system apps, tap the Menu icon (three dots) on the upper-right then select the option to Show system apps.
- Tap Storage.
- Tap the option to Clear Cache or Clear Data. This will delete all temporary files and data stored on the messaging app memory.
Alternatively, you can clear all cached data on your device storage. Here’s how:
- Access the Apps screen by swiping up on an empty spot from the Home screen.
- Then tap Settings.
- Select Device maintenance.
- Then tap Storage on the lower-right.
- Finally, tap clean Now.
Wait until the clearing process is complete then restart your Samsung S9 Plus. See if you can now send MMS on your phone.
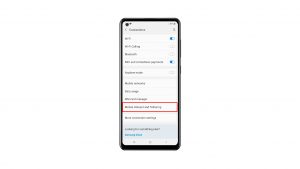
Fourth solution: Reset network settings.
Network errors are also among the possible reasons as to why MMS won’t send on your phone. In fact, a number of smartphone issues were attributed to network problems that can occur unexpectedly or after installing new updates. A possible solution you may consider trying on to deal with the problem is a network settings reset. And here’s how it’s done:
- Swipe up on an empty spot from the Home screen to open the Apps tray.
- Tap Settings.
- Tap General Management.
- Tap Reset.
- Select the option to Reset settings.
- Alternatively, you can try to Reset network settings to restore network defaults on your phone. It also helps especially if the problem is attributed to an incorrect network setting on your device.
- Tap Reset Settings again to continue.
- Enter your device PIN, if prompted.
- Tap Reset Settings to confirm settings reset.
Your device will restart automatically when the network settings reset is finished. Wait until it boots up completely then set up your networks and create a test MMS message to send.
Fifth solution: Reset your phone (Factory data reset).
If none of the prior methods worked and still you cannot send MMS on your Samsung S9 Plus, then your next best possible solution is a system reset or factory data reset. This will wipe everything out from your phone’s internal memory including bugs and erratic data segments that might have inflicted trouble with your messaging application. Just don’t forget to back up all your important data as they will all be deleted in the process. If you’re willing to give it a shot, then you may do so and proceed with these steps:
- Back up your data by going to Apps-> Settings-> Cloud and accounts-> Backup and restore, then select your desired setting. You may opt to Back up my data or go for Automatic restore.
- When the backup is finished, tap the Back icon until you reach the main Settings menu.
- Tap General Management.
- Tap Reset.
- Select Factory data reset option.
- Scroll down and then tap on Reset.
- Then select the option to Delete All.
- Enter your credentials and/or Samsung account information if prompted, then tap to Confirm device reset.
After the reset, you will need to carry out and complete the initial device setup to use your phone again.
Other options
Contact your carrier or network service provider to escalate the problem for further assistance and suggestions if none of the given solutions is able to fix the problem. There might be some other issues either on your account or carrier’s end that need to be settled first for you to be able to use MMS feature on your Samsung Galaxy S9 Plus. You’ve exhausted all possible means on your end but to no avail. So give them a call then.
Connect with us
We are always open to your problems, questions and suggestions, so feel free to contact us by filling up this form. This is a free service we offer and we won’t charge you a penny for it. But please note that we receive hundreds of emails every day and it’s impossible for us to respond to every single one of them. But rest assured we read every message we receive. For those whom we’ve helped, please spread the word by sharing our posts to your friends or by simply liking our Facebook and Google+ page or follow us on Twitter.
Posts you may also like to check out:
- How to fix Samsung Galaxy S9 Plus that won’t turn on (easy steps)
- What to do if your Samsung Galaxy S9 Plus starts to run slow (easy steps)
- How to fix your Samsung Galaxy S9 Plus with Black Screen of Death (easy steps)
- How to Factory Reset or do the Master Reset on Samsung Galaxy S9 Plus and when to use them
- How to fix Spotify that keeps crashing on Samsung Galaxy S9 Plus (easy steps)
- How to fix Facebook app that keeps crashing on Samsung Galaxy S9 Plus? [Troubleshooting Guide]


![Samsung Galaxy S8 started running slow after an update [Troubleshooting guide]](https://thedroidguy.com/wp-content/uploads/2017/06/Samsung-Galaxy-S8-running-slow-300x169.jpg)
![How to fix a Huawei P10 smartphone that won’t turn on? [Troubleshooting Guide]](https://thedroidguy.com/wp-content/uploads/2018/02/huawei-p10-facebook-has-stopped-300x169.jpg)


![How to fix a Samsung Galaxy S9 that cannot read SD card [Troubleshooting Guide]](https://thedroidguy.com/wp-content/uploads/2018/08/S96-300x169.jpg)
![How to fix Samsung Galaxy Note 8 Black Screen of Death [Troubleshooting Guide]](https://thedroidguy.com/wp-content/uploads/2017/11/galaxy-note-8-stuck-logo-300x169.jpg)


